Gravity Forms is a great plugin many WordPress websites use. I’ve used it many client projects in the past and I’ve always missed a feature!
If you are a OS X user you are surely familiar with the “quick view” action – pressing space after selecting an item in Finder. I find this almost instinctive for me and miss it in many situations.
This feature is something which I miss in the list of GF entries. So I set out to build a plugin that does exactly that. This article will also include a step-by-step guide on how I built the plugin.
You can browse the code here or download the plugin here. If you also want to see how it’s built, read on.
Getting started
You should be comfortable coding WordPress plugins and I recommend using and IDE ( like PhpStorm ). This will make navigating a large plugin like Gravity Forms much simpler.
Finding a hook ?
First thing I did was to search for a hook to add the preview button to the list of entries. Easiest way, in my opinion, inspect the table and find something specific:

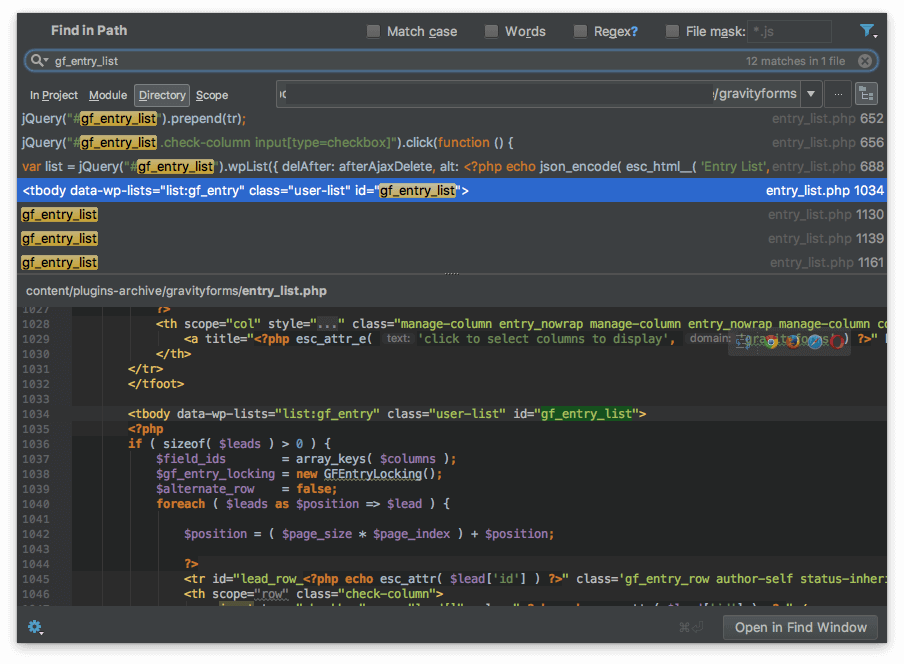
See that id there? “gf_entry_list” – next step is I went in the plugin folder and searched all the files:

Which is where I found the hook we are going to use: gform_entries_first_column_actions. This allows us to add an extra custom button next to the “edit”, “delete”, etc buttons.
Maybe going through the documentation is faster for some people but I find this method to be the most efficient for me.
Adding the button
The next step is going to be to add a button as the preview trigger. Because we are not in a OS interface I think it makes sense to have a click trigger.
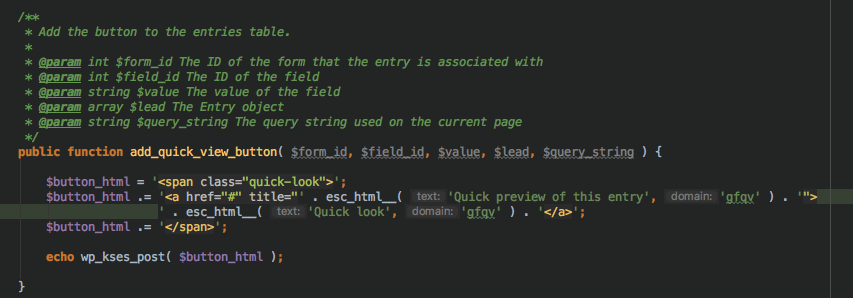
Using the hook found above we add the button to the list of actions:

This will add the button ad the end of the list of actions:
 <<
<<
xt step is to add the id of the entry to the button and move on to the JS part. In this case, the $lead array contains the entry data ( as reflected by the PHPDoc comments ).
The actual functionality
Next we’ll need to add some JS into that page which will handle the loading of the preview. In these cases I usually start writing the code in a separate JS file, but if it turns out to be small I just use the proper hooks to load it only in that page. I’m not a fan of making an extra request although it is easier to maintain.
Adding scripts
Using the hook “admin_enqueue_scripts” the following function came to life:
 Make sure you use the proper hook to avoid loading these scripts on other pages.
The JavaScript
As WP-admin already has it loaded, I used jQuery. Make sure to use the “promise” structure for the Ajax call as the old one is deprecated. Here’s the basic structure which we’ll use to go and define the Ajax handler in PHP.
 Next up: the PHP which will handle the Ajax call and retrieve the GF entry data.
The PHP part of the Ajax call
For Ajax calls, WordPress has a very nice system in place which allows you to hook using the prefix “wp_ajax_” – if you you’re not familiar with it read more here.
Getting the entry data is not a big deal as GF has a proper API and we can use this function:
GFAPI::get_entry( $entry_id );
The only problem here is that the data has no human-readable labels, so it makes no sense.
In order to get over this, we’ll also need the form fields. In the end I decided to load the markup for the pop-up directly with the form table structure ( to avoid loading the form structure each time ).
You can find the form structure easily using:
GFAPI::get_form( $form_id );
In the array retrieved there there will be one entry for the “fields”. Just looping through them and through the entry data is enough. Luckily, GF takes care of ordering things properly for the API.
The markup
A good hook to load the markup of the quick-view panel is “gform_post_entry_list“. This is called at the end of the list and we can pre-load the table there and hide it with CSS.
I’ve loaded a simple markup there to display the info. Using the function mentioned above to retrieve the form structure we end up with something like this:

Linking it all together
Now that all components are in place we just need to send the entry data using the Ajax function and populate the html with it.
First we send the data using wp_send_json to make sure it goes out ok. Next, we loop through the list of labels and populate them with the data in the JSON. Now we can take care of the styles and using a CSS class we can toggle the visibility of the table. The final touch is to also allow users to close that table.
If you want to see the plugin in action you can browse the code here or download it here.