Gravity Forms entries quick view

Gravity Forms is a great plugin many WordPress websites use. I’ve used it many client projects in the past and I’ve always missed a feature!

If you are a OS X user you are surely familiar with the “quick view” action – pressing space after selecting an item in Finder. I find this almost instinctive for me and miss it in many situations.

This feature is something which I miss in the list of GF entries. So I set out to build a plugin that does exactly that. This article will also include a step-by-step guide on how I built the plugin.

You can browse the code here or download the plugin here. If you also want to see how it’s built, read on.

Getting started

You should be comfortable coding WordPress plugins and I recommend using and IDE ( like PhpStorm ). This will make navigating a large plugin like Gravity Forms much simpler.

Finding a hook ?

First thing I did was to search for a hook to add the preview button to the list of entries. Easiest way, in my opinion, inspect the table and find something specific:


See that id there? “gf_entry_list” – next step is I went in the plugin folder and searched all the files:


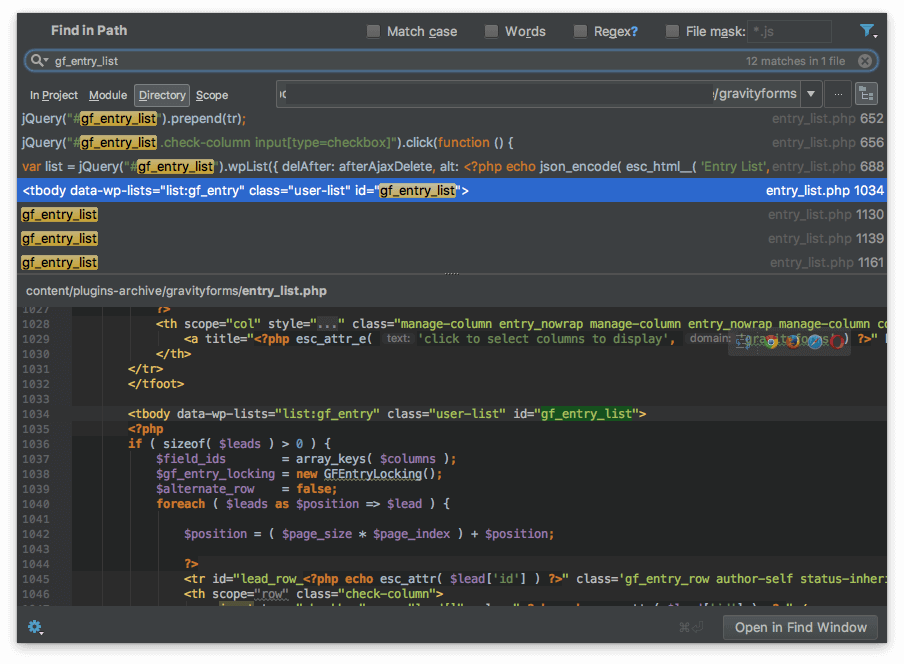
Which is where I found the hook we are going to use: gform_entries_first_column_actions. This allows us to add an extra custom button next to the “edit”, “delete”, etc buttons.

Maybe going through the documentation is faster for some people but I find this method to be the most efficient for me.

Adding the button

The next step is going to be to add a button as the preview trigger. Because we are not in a OS interface I think it makes sense to have a click trigger.

Using the hook found above we add the button to the list of actions:

All the code is available at the end of this article.

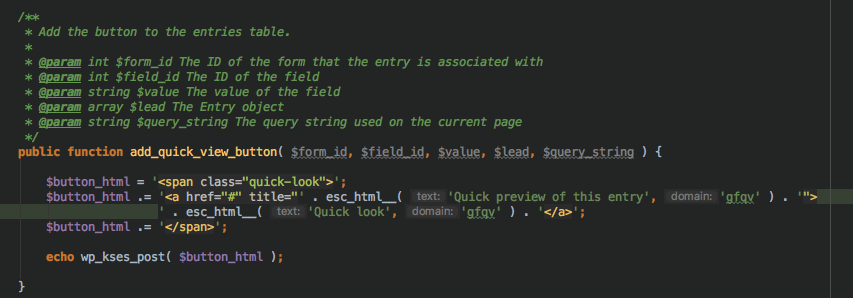
This will add the button ad the end of the list of actions:

<<
xt step is to add the id of the entry to the button and move on to the JS part. In this case, the $lead array contains the entry data ( as reflected by the PHPDoc comments ).

The actual functionality

Next we’ll need to add some JS into that page which will handle the loading of the preview. In these cases I usually start writing the code in a separate JS file, but if it turns out to be small I just use the proper hooks to load it only in that page. I’m not a fan of making an extra request although it is easier to maintain.

Adding scripts

Using the hook “admin_enqueue_scripts” the following function came to life:

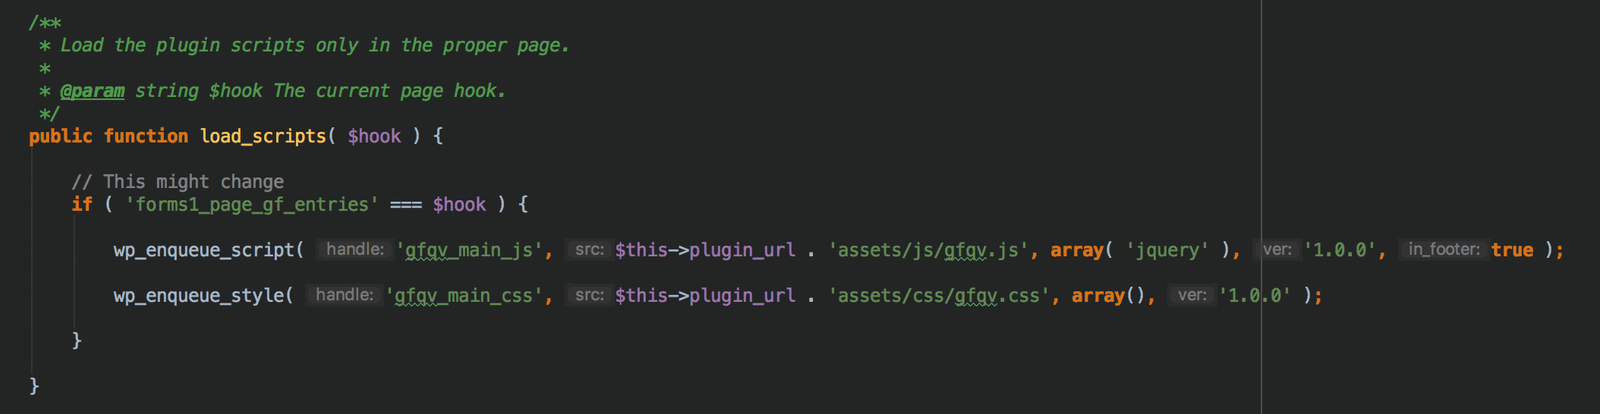
Make sure you use the proper hook to avoid loading these scripts on other pages.

The JavaScript

As WP-admin already has it loaded, I used jQuery. Make sure to use the “promise” structure for the Ajax call as the old one is deprecated. Here’s the basic structure which we’ll use to go and define the Ajax handler in PHP.

Next up: the PHP which will handle the Ajax call and retrieve the GF entry data.

The PHP part of the Ajax call

For Ajax calls, WordPress has a very nice system in place which allows you to hook using the prefix “wp_ajax_” – if you you’re not familiar with it read more here.

Getting the entry data is not a big deal as GF has a proper API and we can use this function:

GFAPI::get_entry( $entry_id );

The only problem here is that the data has no human-readable labels, so it makes no sense.

In order to get over this, we’ll also need the form fields. In the end I decided to load the markup for the pop-up directly with the form table structure ( to avoid loading the form structure each time ).

You can find the form structure easily using:

GFAPI::get_form( $form_id );

In the array retrieved there there will be one entry for the “fields”. Just looping through them and through the entry data is enough. Luckily, GF takes care of ordering things properly for the API.

The markup

A good hook to load the markup of the quick-view panel is “gform_post_entry_list“. This is called at the end of the list and we can pre-load the table there and hide it with CSS.

I’ve loaded a simple markup there to display the info. Using the function mentioned above to retrieve the form structure we end up with something like this:

Linking it all together

Now that all components are in place we just need to send the entry data using the Ajax function and populate the html with it.

First we send the data using wp_send_json to make sure it goes out ok. Next, we loop through the list of labels and populate them with the data in the JSON.Now we can take care of the styles and using a CSS class we can toggle the visibility of the table. The final touch is to also allow users to close that table.

If you want to see the plugin in action you can browse the code here or download it here.

Copy & Print quick setup for websites with examples

When building web directories in particular or websites in general you often need copy & print functionalities.

For example you could allow users to easily copy an address. Or maybe you want to allow users to print certain elements from a list – like a search result.

Having tried & used multiple solutions in the past I recently found a combination which I think works great.

As a result, I suggest using 2 simple plugins.

Copy / Clipboard

For the copy/functionality, the best cross-browser solution, in my opinion, at this moment is clipboard.js.

A quick usage example ( besides the examples on their website ) would be:

The plugin gets its value from the data attribute “data-clipboard-text” in the example above. Also the button’s text is changed, after clicking the link, so your users have a nice feedback.

Printing

A good stylesheet is the key to printing pages properly. The problem is that sometimes it’s hard to manage this for dynamic elements. One solution which I used successfully is the jQuery plugin printThis.

This plugin gives you the option to directly print independent elements. Let’s say you want to allow users to print only the search result relevant to them.

Here’s a code sample which I think is self-explanatory, the plugin is very easy to use.

The 2 examples above will come in handy for many websites. I think these plugins will allow you to easily integrate functionality which will make the website more interactive.

Adding custom commissions to WC Vendors

Let’s say for some reason you want to add custom commissions to WC Vendors. The main thing you’ll need is the filter “wcv_commission_rate“.

The way this filter works is that it allows you to add on top of the calculated commission by also passing along the product price.

Use cases & code

Let’s say for example that you want your vendors to cover the credit card commissions. You’d have to check the gateway used for checkout on that specific order and update the commission.

You can see the code below:

Please note that the gateway may not approve of this practice! Always check their terms before doing this.

Another nice use case would be to give vendors different commissions based on the order location. So let’s say that you want to give them more of the sale for countries in which you have less sales.

In this case you’d have something among the lines of:

Notice that in this case, the commission gets added to the initial commission so the vendor actually gets MORE.

Be careful though – if you are going to set options for this, don’t allow users to go over 100%. I would also add a check directly in the function above in such a case.

Another nice use case I just thought of would be to check if the customer is new on the website and give the vendor a bonus like – no commission for the first purchase!

Let me know in the comments if that would be a good idea for a plugin.

WordPress TinyMCE button for shortcode

For those of you who didn’t know, TinyMCE has a straight-forward way to include a form in a modal window which you can use to generate shortcodes.

This is great news because it will make WordPress editors much less prone to error not having to write shortcodes by hand.

How do you do it?

So the approach in the WordPress way to do this is:

  1. Add the button to the WordPress TinyMCE toolbar using the “mce_buttons” ( or others ) filter.
  2. Ask TinyMCE to load a new JavaScript plugin for the editor which will handle the button.
  3. In the TinyMCE JavaScript plugin add the button and handle its events.
  4. Optionally if you have a custom shortcode, define it with its arguments.

In my example I have created a small plugin, which can be found on Github.

The plugin will add a button on the first row of the editor which when clicked will open a modal. The modal is handled by the WindowManager class included in TinyMCE. Another great part of using this approach is that you already have what is needed to generate a form.

After that, getting the parameters from the form and generating a shortcode to be inserted in the content is pretty easy.

You can get the whole plugin here.

I think the code is self-explanatory for the most part.

Things to watch out for

The code can be easily included in another plugin and extended to generate multiple buttons.

One issue I found not very intuitive at first is that if you add another button you will need to define another plugin for it to be taken into consideration, even if it’s in the same file.

So in the function where you add the js plugins you’ll end up with:

function add_embed_button_js( $plugin_array ) {
   $plugin_array['msb_button'] = plugin_dir_url( MSB_PLUGIN_FILE ) . 'assets/js/embed_button.js';
   $plugin_array['msb_button_2'] = plugin_dir_url( MSB_PLUGIN_FILE ) . 'assets/js/embed_button.js';
   return $plugin_array;
}

I trust that TinyMCE won’t attempt to load the same file 2 times. Also I am aware it might not be the right approach but it works!

Also, as mentioned in the plugin README – by default the plugin will add a button with no icon so you might miss it.

What I use to recover Mac OS X space

Many times, especially after long usage, Mac OS X eats up a lot of space. In the latest version, macOS Sierra, they even included a “Storage manager” to help you clean unused files. This is great, and a step forward, but I have found most of my space gets lost in temporary files.

Determine what’s causing the issue

The basic OS X storage scanner shows you Applications, Photos, Videos, etc and System section. Unfortunately no actions are available in the System section so here’s what I’ve done:

I scanned the storage using a small app called “OmniDiskSweeper” which allowed me to find the root of lost storage. In my case the largest folder ( sometimes over 80gb ) was /private/var/tmp.

Reading around the internet some people say it’s bad practice to delete anything there as it may cause issues with your programs or lose unsaved data. I highly recommend making a backup before proceeding further.

Because the computer was sluggish and I thought freeing some space will make it faster ( which was actually true ) I decided to empty it!

So I used:
rm -rf *.xt

Use with caution & note that it might break some running programs. Although I must confess – it never did for me, I usually save my work, close all the apps and run the command above. I’ve used it 10 times until now with no issues.

Also please note this might not be the issue on your system so it’s not always this problem.

Why this happens?

From my reading I found that OS X runs a cron which should delete temporary files older than 3 days. I suspect that some of the programs I use, especially for local development, continuously use large temporary files which never get to the 3 days cue.

Another suspicion I have is that it’s a permissions issue, I tried running a “repair permissions” from the Disk utility on the recovery partition but I saw no improvement.

Extend wp-admin search to use custom fields

UPDATE: For the WooCommerce-friendly version of this, see this article.

I think the title is self-explanatory but let’s detail the situation a bit:

Let’s presume you have a custom post type for Cars and for each car you have the VIN number in a custom field. You want to allow users to search from the admin directly by that field. Also, you need them to use the default search input:

Wp-admin search

The code

First we have to find the right hook to extend the search with. In our case I found the best results with the posts_search filter.

Next, the logic! Keep in mind this filter is being called in the get_posts function of the WP_Query class, so everywhere. That results in adding a check to see if we are on the right page.

Also, keep in mind that we are altering the “where” part of the actual SQL query.

Further usage

Like I mentioned before – this snippet checks if the search is performed in the admin, but that also means you can use it in the frontend. So if you’d like to extend the default WordPress search to enable custom field searches you can change the logic at the top. This can be easily switched to enable WooCommerce products search by SKU or similar.

Youtube embed preview image

Let’s take the following situation: you have lots of YouTube embeds on a page and the page is loading extremely slow ( sometimes not loading at all! ) – what can be done?

Fortunately I had to fix this exact problem for a client recently and here’s the approach I used. Instead of adding the actual YouTube iframe by default I thought a good approach would be to use the video’s thumbnail which on click would be replaced by the iframe.

Getting the YouTube video’s thumbnail image

First you need the YouTube video id, let’s take for example: https://www.youtube.com/watch?v=VdphvuyaV_I – in this case the id is: “VdphvuyaV_I”.

Next you have to decide on the image size, there are 4 size available ( more info here ): default, medium quality, standard quality and high quality. I usually use the high quality size which is 480px x 360px.

So in our case the thumbnail url is: https://img.youtube.com/vi/VdphvuyaV_I/hqdefault.jpg – notice the video id in the url.

Making the thumbnail clickable

Next up is adding a JavaScript action that will switch the image to the iframe on click. I chose to include the full embed url – in case you want to use this with Vimeo ( it’s possible ). So the markup is:

<div class="m_load_here">
<img src="https://img.youtube.com/vi/VdphvuyaV_I/hqdefault.jpg" alt="YouTube Video" />
<a class="m_overlay" href="#" data-src="//www.youtube.com/embed/VdphvuyaV_I?wmode=transparent&autoplay=1">
</div>

I recommend placing this inside a div with the styling of your choice, for example 3 columns per row. And the js needed to do the switch:

<script type="text/javascript">
   jQuery( function ($) {
      $('.m_overlay').click(function (e) {
         e.preventDefault();
         var th = $(this);
         var embed_url = th.data('src');
         var width = th.width();
         var height = th.height();
         var iframe = '<iframe src="'+embed_url+'" width="'+width+'" height="'+height+'"></iframe>';
         th.parent().html(iframe);
      });
   });
</script>

Styling it to look like a video

Because we are replacing a video we should make it look similar, so what we’ll also need is the video title. The easiest way to get that without using the annoying YouTube API that needs authentication is using the oEmbed feature.

In a WordPress context I would store the video info in a transient. Use this code to only pull the video title once a month:

$id = 'VdphvuyaV_I';
$video_title_transient = get_transient('m_yt_title_'.$id);
if ( !$video_title_transient ) {
   $video_info = file_get_contents('https://www.youtube.com/oembed?url=http://www.youtube.com/watch?v='.$id.'&format=json');
   $video_info = json_decode($video_info);
   if ( $video_info && isset($video_info->title) ) {
      $video_title_transient = $video_info->title;
      set_transient('m_yt_title_'.$id, $video_title_transient, MONTH_IN_SECONDS);
   }
}

Next step is to place these over the thumbnail so they look similar to the embed. The html I used is:

<div class="m_load_here">
<img src="https://img.youtube.com/vi/VdphvuyaV_I/hqdefault.jpg" alt="YouTube Video" />
<a class="m_overlay" href="#" data-src="//www.youtube.com/embed/VdphvuyaV_I?wmode=transparent&autoplay=1">
<span class="m_yt_title"><?php echo $video_title_transient; ?></span>
<span class="m_yt_button"><svg height="100%" version="1.1" viewBox="0 0 68 48" width="100%"><path class="ytp-large-play-button-bg" d="m .66,37.62 c 0,0 .66,4.70 2.70,6.77 2.58,2.71 5.98,2.63 7.49,2.91 5.43,.52 23.10,.68 23.12,.68 .00,-1.3e-5 14.29,-0.02 23.81,-0.71 1.32,-0.15 4.22,-0.17 6.81,-2.89 2.03,-2.07 2.70,-6.77 2.70,-6.77 0,0 .67,-5.52 .67,-11.04 l 0,-5.17 c 0,-5.52 -0.67,-11.04 -0.67,-11.04 0,0 -0.66,-4.70 -2.70,-6.77 C 62.03,.86 59.13,.84 57.80,.69 48.28,0 34.00,0 34.00,0 33.97,0 19.69,0 10.18,.69 8.85,.84 5.95,.86 3.36,3.58 1.32,5.65 .66,10.35 .66,10.35 c 0,0 -0.55,4.50 -0.66,9.45 l 0,8.36 c .10,4.94 .66,9.45 .66,9.45 z" fill="#1f1f1e" fill-opacity="0.81"/><path d="m 26.96,13.67 18.37,9.62 -18.37,9.55 -0.00,-19.17 z" fill="#fff"/><path d="M 45.02,23.46 45.32,23.28 26.96,13.67 43.32,24.34 45.02,23.46 z" fill="#ccc"/></svg></span>
</div>

You will notice this is the actual SVG for the YouTube button, and below is the CSS:

   .ytp-large-play-button-bg {
      fill: #1f1f1f;
      fill-opacity: 0.81;
      transition: fill 0.1s cubic-bezier(0.4, 0, 1, 1) 0s, fill-opacity 0.1s cubic-bezier(0.4, 0, 1, 1) 0s;
   }
   .m_overlay:hover .ytp-large-play-button-bg {
      fill: #cc181e;
      fill-opacity: 1;
      transition: fill 0.1s cubic-bezier(0, 0, 0.2, 1) 0s, fill-opacity 0.1s cubic-bezier(0, 0, 0.2, 1) 0s;
   }
   .m_yt_button {
      background: rgba(0, 0, 0, 0) none repeat scroll 0 0;
      border-radius: 10px;
      height: 30px;
      left: 50%;
      position: absolute;
      top: 50%;
      transform: translate(-50%, -50%);
      width: 42px;
      z-index: 5;
      display: block;
   }
   .m_overlay {
      left: 0;
      top:0;
      right: 0;
      bottom :0;
      position: absolute;
   }
   .m_yt_title {
      color: #FFF;
      outline: 0 none;
      text-decoration: none;
      transition: color 0.1s cubic-bezier(0, 0, 0.2, 1) 0s;
      float: left;
      max-width: 100%;
      overflow: hidden;
      overflow-wrap: normal;
      text-overflow: ellipsis;
      white-space: nowrap;
      font-size: 18px;
      padding: 14px 16px 0;
   }


Using WordPress with a database in the cloud

Looking for a way to speed up a WordPress website with a very large database? One solution might be to use an external database in the cloud.

The first thing that came to my mind was to look at Amazon AWS for their solution. I found that it’s called Amazon RDS and you can use it as a replacement for your local database. Of course there are also other similar solutions offered by Google and Microsoft Azure.

Setting it up

The setup is fairly easy, I used the steps described here and although the AWS interface has changed, the process is pretty similar. You have to login to the AWS dashboard and choose RDS from the Services dropdown. On that page click on the “Launch a DB instance” button.

A sidenote: The interesting part is on the next page, you can choose from multiple types of databases and what caught my eye was the Amazon Aurora option which is MySQL compatible! (which means you can just import an SQL dump ). Digging more into it I found that WordPress linked to an Amazon Aurora DB has proven to give great results.

If you choose either Aurora or MySQL you will have similar steps to set up and you can choose the processing power and set a master username and password to connect to the db server.

After the setup it will take a few minutes for the server to come online. Afterwards you can connect to it directly and import your database ( if you have an existing website ) – on OS X I recommend using Sequel Pro. For the server use the “endpoint” from the dashboard and the username and password you set in the setup.

Next you just change the database details in the wp-config.php file to the ones you find in the Amazon RDS dashboard. If everything went well you should have an WordPress website running on a cloud database, cool!

Some notes

Be careful which pack you choose as an Aurora server tends to get expensive quickly. From my estimates, the cheapest goes to around 200$ per month.

For the regular MySQL db you can go for as low as 12$ per month from what I have read.

Also make sure that you choose an AWS region that is close to your website’s host server. This will greatly influence the loading times and might cause more problems than improvements.

WordPress website running Avada very slow when saving posts

If you are running ThemeFuse’s extremely popular template Avada and the website is very slow when saving/publishing posts this may help. This only applies to websites with lots of posts ( or WooCommerce products ).

Make sure this is the issue

The easiest way to check if this is what’s causing the issue is to install the plugin “Delete Expired Transients“. After you installed it go to “Tools > Delete transients” and check the number of expired transients on your website. If you have tens of thousands of transients this is very likely the issue.

The fix for Avada

Before clearing that data make sure you disable it so please go to “Appearance > Theme Options > Advanced > Dynamic CSS” and turn off Database Caching for Dynamic CSS.

Afterwards go back to the Delete transients page and delete all the expired transients ( the first option ). At this point you should experience a great improvement of the loading times when publishing/updating posts.

They mention in the documentation that the Dynamic CSS caching functionality might cause slowness with large websites. In case you missed it this is what happens:

A transient is added to the website’s database each time you create a new post in order to load custom css faster.

What are transients?

In WordPress, Transients are database entries made to store data more conveniently to access. In this case, the Avada theme stores custom CSS rules in order to prevent more complicated queries in a transient for each post, that’s why this is an issue only with a large number of posts.

More on transients and how to use them you can read at Css-tricks or in the codex page.

Transform Gravity Forms sections into an accordion with jQuery

On a project I was working last week I was asked to create an accordion structure, for ease of use, from an existing Gravity Forms form. The form had a structure in which price fields were separated by section fields, which is a great structure to start with.

Prerequisites

First thing – the form has to contain sections which separate groups of fields.

The second thing is to identify what kind of fields are contained between the sections ( maybe they are not all the same ). Make a note of the specific css classes of those fields. For example: price fields have the class “gfield_price”.

The code

First you have an array for the section which you will check to identify what to do. Next you create an accordion container which will contain the fields whose visibility you can toggle. After that you append the fields to the container and add the actions which allow opening/closing accordions. Bonus: you can also add a small text to make the section more intuitive to click.

This is the final code with explanations for each operation:

EDIT: after a comment making a good observation I updated the code to include a toggle of the EXPAND/COLLAPSE text.